
Deploying a Django app to AWS using Elastic Beanstalk
Recently a friend of mine enlisted my help to get his Django app deployed on AWS using Elastic Beanstalk.
I’ve never built an app using Django, and my AWS skills are rusty, so I decided to record mistakes that tripped me up for my own future reference.
If this post ends up helping you, great! This is mostly an unstructured brain dump. Please pardon the mess. If you have any questions or corrections, please don’t hesitate to let me know.
Interfaces
I use both Amazon’s web console GUI for Elastic Beanstalk, and its command line interface EB CLI.
Git and EB CLI
It took me a while to realize that the eb command works with committed code. Uncommitted changes won’t be reflected in the deployed environment.
I wasted almost an hour due to not reading the docs. Later I found the .elasticbeanstalk/config.yml file, where eb tracks the Git branches it’s working with.
I learned that I’m supposed to use the eb command to associate a Git branch with a Beanstalk environment, like this:
$ git checkout main
$ eb use prod # prod = Elastic Beanstalk environment name
$ git checkout develop
$ eb use test1
When deploying, it’s a good idea to use the --label option to help me remember what was deployed. This label will be displayed when I run eb status (docs here).
eb deploy --label 1.0.0
Procfile
Elastic Beanstalk works with Buildfile and Procfile. I chose to go with the Procfile format. Beanstalk doesn’t like empty lines in the Procfile. It will error out.
Dependency issue - psycopg2
Next I ran into a dependency issue.
Error: pg_config executable not found.
pg_config is required to build psycopg2 from source. Please add the directory containing pg_config to the $PATH or specify the full executable path with the option:
This was because my instance tried to build psycopg2 from source. I fixed it by switching from psycopg2 to psycopg2-binary in requirements.txt. Like this:
#psycopg2==2.8.5
psycopg2-binary==2.8.5
HTTPS
By default the classic load balancer set up by Elastic Beanstalk only works with HTTP over port 80.
This is what I did to enable HTTPS for my deployed environment:
Provision SSL certificate
Configure the load balancer to accept HTTPS over port 443
SSL certificate
I went to AWS Certificate Manager (ACM) to request a free certificate.
In the fully qualified domain name section, make sure to enter at least two values. One for the naked domain, and another for the * subdomain wildcard like this:

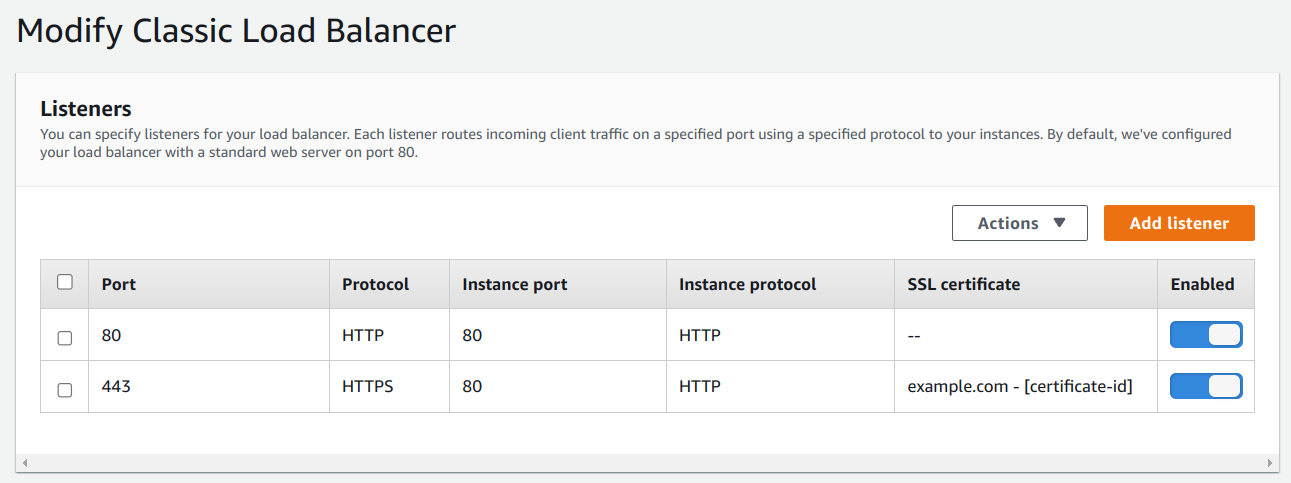
Load balancer
To configure the load balancer, I went to: Elastic Beanstalk → <the_environment_to_be_configured> → Edit → Add listener
The instance port should be 80 and instance protocol should be HTTP, always. Unless you’ve configured your internal web server to accept HTTPS, which 99% of the time is not the case.
Static files
To manage static files, my app uses the WhiteNoise library, which inspects the STATIC_ROOT variable to determine where to collect static files. For me, it’s the ‘staticfiles’ folder:
STATIC_ROOT = str(ROOT_DIR / "staticfiles")
I got Beanstalk to inform the Nginx proxy server of this folder by creating a file named .ebextensions/python.config containing these lines:
option_settings:
  aws:elasticbeanstalk:environment:proxy:staticfiles:
    /static: staticfiles

container_commands:
  collectstatic:
    command: "source /var/app/venv/staging-LQM1lest/bin/activate && python manage.py collectstatic --noinput"
Let’s break down what’s happening in my .ebextensions/python.config file.
aws:elasticbeanstalk:environment:proxy:staticfiles allows us to tell Nginx two things. To the left of the colon symbol is the “web folder” requested by the end user’s browser. For example, the browser requesting a logo at https://www.example.com/static/logo.png. To the right of the colon symbol is the server’s local file system folder where Nginx looks for static files to serve. For me, the value is staticfiles, as per the STATIC_ROOT variable.
You can find more information about aws:elasticbeanstalk:environment:proxy:staticfiles on Amazon’s website.
The container_commands block in the above config file allows us to execute arbitrary commands after the application zip has been extracted, but before the application is deployed. That’s when I tell Django to collect static files into the staticfiles folder.
You can read more about container_commands here.
Accessing ElastiCache cluster from outside of AWS
Every now and then I need to connect to my ElastiCache cluster from my development machine.
This official AWS doc guides us how to do so securely, using AWS Client VPN.
It is quite an involved process, the requiring the following steps to be undertaken:
Create a server certificate
Create an AWS Client VPN endpoint
Associate the ElastiCache cluster to the VPN endpoint
Authorize the VPN access to ElastiCache host
Download VPN client configuration
Make edits to the VPN client configuration
Connect to the VPN endpoint using the above configuration
Finally, connect to the ElastiCache cluster using a Redis client such as redis-cli or RedisInsight. The connection details look like this:
Host: my-elasticache-name.some-code.ng.0001.aws-region.cache.amazonaws.com
Port: 6379
A simpler (but potentially more expensive) alternative is to have a bastion host (aka jump server or jump box) that runs an SSH server. You then use this bastion host to facilitate port forwarding (aka SSH tunneling) to your ElastiCache cluster.
Logging
The AWS web console provides an easy point-and-click access to log files. I can request Beanstalk to collate logs from all servers by going to Elastic Beanstalk → <environment> → Logs.

Sometimes though, combined logs can be harder to shift through, if I just want to focus on one specific thing. In that case, I find it easier to just SSH into the specific EC2 instance you’re investigating and find the appropriate log file in /var/logs.
Do you practice Basecamp’s Shape Up methodology at work? Check out our Shape Up Board for Jira plugin.